Friday, 15 February 2019

Jmeter

Database Testing:

(1) Add mysql JDBC to Jmeter lib folder and restart Jmeter

(2) Right click on test name -> add  Thread group

(3) Right click  Thread group -> add JDBC connection configuration

(4) Thread group -> sampler ->JDBC Request

(5) Write query

(6) thread group -> Listener -> view result in table

(7) thread group -> Listener -> view result in tree

(8) run and validate


FTP Upload and Download:

(1)  Right click on test name -> add  Thread group

(2) Right click  Thread group -> sampler -> FTP request

(3)

Sunday, 20 January 2019

eXtreme Programming (XP)

eXtreme Programming (XP)

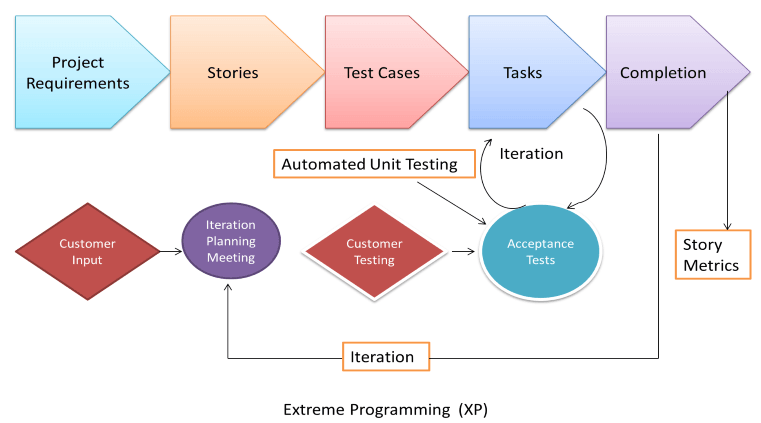
Extreme Programming technique is very helpful when there is constantly changing demands or requirements from the customers or when they are not sure about the functionality of the system. It advocates frequent "releases" of the product in short development cycles, which inherently improves the productivity of the system and also introduces a checkpoint where any customer requirements can be easily implemented. The XP develops software keeping customer in the target.
Business requirements are gathered in terms of stories. All those stories are stored in a place called the parking lot.
In this type of methodology, releases are based on the shorter cycles called Iterations with span of 14 days time period. Each iteration includes phases like coding, unit testing and system testing where at each phase some minor or major functionality will be built in the application.

Phases of eXtreme programming:

There are 6 phases available in Agile XP method, and those are explained as follows:

Planning

  • Identification of stakeholders and sponsors
  • Infrastructure Requirements
  • Security related information and gathering
  • Service Level Agreements and its conditions

Analysis

  • Capturing of Stories in Parking lot
  • Prioritize stories in Parking lot
  • Scrubbing of stories for estimation
  • Define Iteration SPAN(Time)
  • Resource planning for both Development and QA teams

Design

  • Break down of tasks
  • Test Scenario preparation for each task
  • Regression Automation Framework

Execution

  • Coding
  • Unit Testing
  • Execution of Manual test scenarios
  • Defect Report generation
  • Conversion of Manual to Automation regression test cases
  • Mid Iteration review
  • End of Iteration review

Wrapping

  • Small Releases
  • Regression Testing
  • Demos and reviews
  • Develop new stories based on the need
  • Process Improvements based on end of iteration review comments

Closure

  • Pilot Launch
  • Training
  • Production Launch
  • SLA Guarantee assurance
  • Review SOA strategy
  • Production Support
There are two storyboards available to track the work on a daily basis, and those are listed below for reference.
  • Story Cardboard
    • This is a traditional way of collecting all the stories in a board in the form of stick notes to track daily XP activities. As this manual activity involves more effort and time, it is better to switch to an online form.
  • Online Storyboard
    • Online tool Storyboard can be used to store the stories. Several teams can use it for different purposes.

Agile Model

AGILE methodology is a practice that promotes continuous iteration of development and testing throughout the software development life cycle of the project. Both development and testing activities are concurrent unlike the Waterfall model

The agile software development emphasizes on four core values.
  1. Individual and team interactions over processes and tools
  2. Working software over comprehensive documentation
  3. Customer collaboration over contract negotiation
  4. Responding to change over following a plan

Agile Testing Methodology

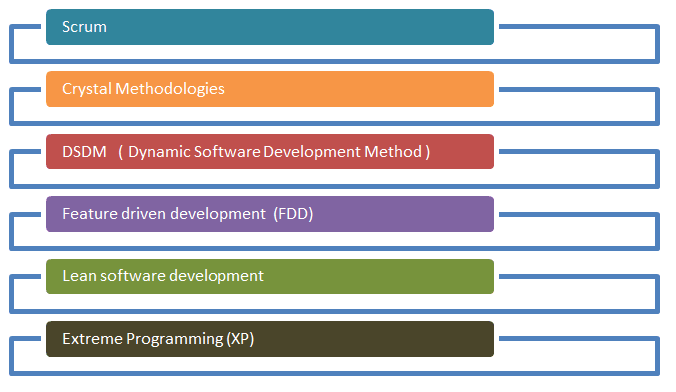
There are various methods present in agile testing, and those are listed below:

Scrum

SCRUM is an agile development method which concentrates specifically on how to manage tasks within a team-based development environment. Basically, Scrum is derived from activity that occurs during a rugby match. Scrum believes in empowering the development team and advocates working in small teams (say- 7 to 9 members). It consists of three roles, and their responsibilities are explained as follows:
  • Scrum Master
    • Master is responsible for setting up the team, sprint meeting and removes obstacles to progress
  • Product owner
    • The Product Owner creates product backlog, prioritizes the backlog and is responsible for the delivery of the functionality at each iteration
  • Scrum Team
    • Team manages its own work and organizes the work to complete the sprint or cycle

Product Backlog

This is a repository where requirements are tracked with details on the no of requirements to be completed for each release. It should be maintained and prioritized by Product Owner, and it should be distributed to the scrum team. Team can also request for a new requirement addition or modification or deletion

Scrum Practices

Practices are described in detailed:

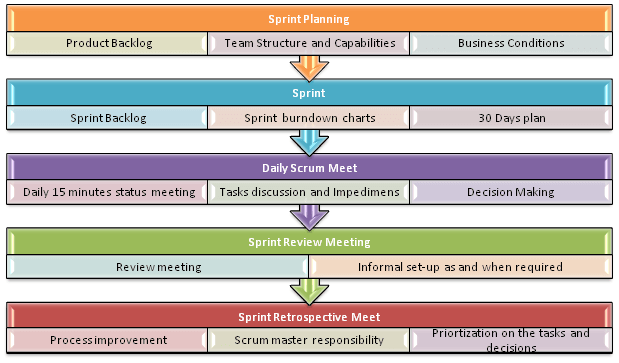
Process flow of Scrum Methodologies:

Process flow of scrum testing is as follows:
  • Each iteration of a scrum is known as Sprint
  • Product backlog is a list where all details are entered to get end product
  • During each Sprint, top items of Product backlog are selected and turned into Sprint backlog
  • Team works on the defined sprint backlog
  • Team checks for the daily work
  • At the end of the sprint, team delivers product functionality

Monday, 29 October 2018

Page Factory

What is Page Factory?

Page Factory is an inbuilt Page Object Model concept for Selenium WebDriver but it is very optimized.


Here as well, we follow the concept of separation of Page Object Repository and Test Methods. Additionally, with the help of PageFactory class, we use annotations @FindBy to find WebElement. We use initElements method to initialize web elements

EXAMPLE :

step:1 Create two new packages and give name pages and tests
           right click on src->new->packages

step:2 Crate pom of pages
           right click on pages->new-.class
            here you give class name "Loginpage"

Login page using page factory

--------------------------------------------------------------------------------------------------------------------
public class Loginpage {

 WebDriver driver;

@FindBy(xpath="html/body/div[1]/div[3]/div/div/div/div/div[2]/form/table/tbody/tr[2]/td[1]/in  put"]")
WebElement mail;

 @FindBy(xpath="html/body/div[1]/div[3]/div/div/div/div/div[2]/form/table/tbody/tr[2]/td[2]/input"]");
WebElement pass;

@FindBy(xpath="html/body/div[1]/div[3]/div/div/div/div/div[2]/form/table/tbody/tr[2]/td[3]/label/input");
WebElement login;

public Homepage(WebDriver driver)
{
this.driver = driver;
PageFactory.initElements(driver, this);
                

}
//create constructor of class with pagefactory

public void getmail(String mailid)
{
mail.sendKeys(mailid);

}
//make method of get value of emaild id

public void getpass(String password)
{
mail.sendKeys(password);

}


public void log()
{
               login.click();
}
//make method for click on loging button

//now we make one common method who provide all in one

public void logintofb(String mailid, String password)
{
this.getmail(mailid);
                this.getpass(password);
this.log();
}


--------------------------------------------------------------------------------------------------------------------
now we create all pages which need in testing

Step:4 make main java class in tests package


package tests;

import org.openqa.selenium.WebDriver;
import org.openqa.selenium.chrome.ChromeDriver;

import pages.Loginpage;
import pages.fbhomepage;

public class Setup {

public static void main(String[] args) throws InterruptedException {
// TODO Auto-generated method stub
System.setProperty("webdriver.chrome.driver","D:\\vishal\\selenium\\chromedriver_win32\\dasdf\\chromedriver.exe");
WebDriver driver= new ChromeDriver();
driver.get("https://www.facebook.com");
Loginpage objlog;
                 //create object of page
objlog = new Loginpage(driver);
objlog.logintomail("vishallaniya1997", "vlaniya@123");
Thread.sleep(3000);
driver.close();

}

}


POM(page objective modeling)

POM (Page Objective Modeling)
  • Page Object Model is a design pattern to create Object Repository for web UI elements.
  • Under this model, for each web page in the application, there should be corresponding page class.
  • This Page class will find the Web Elements of that web page and also contains Page methods which perform operations on those Web Elements.
  • Name of these methods should be given as per the task they are performing, i.e., if a loader is waiting for the payment gateway to appear, POM method name can be waitForPaymentScreenDisplay().

Advantages of POM

  1. Page Object Patten says operations and flows in the UI should be separated from verification. This concept makes our code cleaner and easy to understand.
  2. The Second benefit is the object repository is independent of test cases, so we can use the same object repository for a different purpose with different tools. For example, we can integrate POM with TestNG/JUnit for functional Testing and at the same time with JBehave/Cucumber for acceptance testing.
  3. Code becomes less and optimized because of the reusable page methods in the POM classes.
  4. Methods get more realistic names which can be easily mapped with the operation happening in UI. i.e. if after clicking on the button we land on the home page, the method name will be like 'gotoHomePage()'.    

EXAMPLE :

step:1 Create two new packages and give name pages and tests
           right click on src->new->packages

step:2 Crate pom of pages
           right click on pages->new-.class
            here you give class name "Loginpage"

Login page pom file
--------------------------------------------------------------------------------------------------------------------
public class Loginpage {
WebDriver driver;
By mail = By.xpath("html/body/div[1]/div[3]/div/div/div/div/div[2]/form/table/tbody/tr[2]/td[1]/input");
By pass= By.xpath("html/body/div[1]/div[3]/div/div/div/div/div[2]/form/table/tbody/tr[2]/td[2]/input");
By login =By.xpath("html/body/div[1]/div[3]/div/div/div/div/div[2]/form/table/tbody/tr[2]/td[3]/label/input");
//you also use name , id ,css and other behalf of xpath

public Homepage(WebDriver driver)
{
this.driver = driver;
}
//here we create constructor of class

public void getmail(String mailid)
{
driver.findElement(mail).sendKeys(mailid);
//make method of get value of emaild id

public void getpass(String password)
{
driver.findElement(pass).sendKeys(password);
//make method of get value of password

public void log()
{
                driver.findElement(login).click();
}
//make method for click on loging button

//now we make one common method who provide all in one

public void logintofb(String mailid, String password)
{
this.getmail(mailid);
                this.getpass(password);
this.log();
}


--------------------------------------------------------------------------------------------------------------------
now we create all pages which need in testing

Step:4 make main java class in tests package

package tests;

import org.openqa.selenium.WebDriver;
import org.openqa.selenium.chrome.ChromeDriver;

import pages.Loginpage;
import pages.fbhomepage;

public class Setup {

public static void main(String[] args) throws InterruptedException {
// TODO Auto-generated method stub
System.setProperty("webdriver.chrome.driver","D:\\vishal\\selenium\\chromedriver_win32\\dasdf\\chromedriver.exe");
WebDriver driver= new ChromeDriver();
driver.get("https://www.facebook.com");
Loginpage objlog;
                 //create object of page
objlog = new Loginpage(driver);
objlog.logintomail("vishallaniya1997", "vlaniya@123");
Thread.sleep(3000);
driver.close();

}

}

Friday, 26 October 2018

Test Scenario vs Test Condition

What is Test Scenario?

A Test Scenario is a probable way or method to test an Application.

What is a Test Condition?

Test Condition is the specification that a tester must follow for testing an Application. There can be multiple Test Conditions in a Test Scenario.
Difference between Test Scenario and Test Condition is a very common FAQ amongst QA beginners.
Below is a detailed comparison
Test Scenario
Test Condition
  • Test scenario is a possible ways to test an application.
  • Test condition is the constraint that you should follow to test an application.
  • Test scenario can be a single or a group of test cases
  • Test condition can be a piece of functionality or anything you want to verify. In simple terms the goal of a test cases
  • It is important when time is less and most team members understand the details from one line scenario
  • It is an item or event of a system that could be verified by one or more test cases. Eg; transaction, function, structural element etc.
  • Good Test coverage can be achieved by dividing application in test scenarios which reduces the complexity
  • Good Test Condition ensure system is bug free
  • Test scenario are rather vague and covers wide range of possibilities
  • Test condition are very specific
Example: For testing you have so many ways like positive testing, negative testing, BVA etc.Example: When User Name and Password are valid then application will move forward

Thursday, 25 October 2018

Alert handling in selenium webdriver

Simple alert

Simple alerts just have a OK button on them. They are mainly used to display some information to the user. The first alert on our test page is a simple alert. Following code will read the text from the Alert and then accept the alert.

Code:
package alert;

import org.openqa.selenium.Alert;
import org.openqa.selenium.By;
import org.openqa.selenium.WebDriver;
import org.openqa.selenium.WebElement;
import org.openqa.selenium.chrome.ChromeDriver;

public class SimpleAlert {

public static void main(String[] args) {
// TODO Auto-generated method stub
System.setProperty("webdriver.chrome.driver", "D:\\vishal\\selenium\\chromedriver_win32\\dasdf\\chromedriver.exe");     
WebDriver driver= new ChromeDriver();
    driver.get("http://toolsqa.com/handling-alerts-using-selenium-webdriver/");
    
    WebElement simplealert=driver.findElement(By.xpath("html/body/div[1]/div[5]/div[2]/div/div/p[4]/button"));
    simplealert.click();
    //click on the simple alert button
    Alert alert=driver.switchTo().alert();
    String message=alert.getText();
    System.out.println("Alert="+message);
    alert.accept();
    
}

}

--------------------------------------------------------------------------------------------------------------------------

Confirmation Alert

This alert comes with an option to accept or dismiss the alert. To accept the alert you can use Alert.accept() and to dismiss you can use the  Alert.dismiss()

Code:
package alert;

import org.openqa.selenium.Alert;
import org.openqa.selenium.By;
import org.openqa.selenium.WebDriver;
import org.openqa.selenium.WebElement;
import org.openqa.selenium.chrome.ChromeDriver;

public class ConfirmationAlert {

public static void main(String[] args) {
// TODO Auto-generated method stub
System.setProperty("webdriver.chrome.driver", "D:\\vishal\\selenium\\chromedriver_win32\\dasdf\\chromedriver.exe");     
WebDriver driver= new ChromeDriver();
    driver.get("http://toolsqa.com/handling-alerts-using-selenium-webdriver/");
    
    WebElement confirmationalert=driver.findElement(By.xpath("html/body/div[1]/div[5]/div[2]/div/div/p[8]/button"));
    confirmationalert.click();
    Alert alert=driver.switchTo().alert();
    String message=alert.getText();
    System.out.println("Alert="+message);
    alert.accept();
    //you also use alert.dismiss() comand for alert
    driver.close();
}

}

------------------------------------------------------------------------------------------------------

Prompt Alerts

In prompt alerts you get an option to add text to the alert box. This is specifically used when some input is required from the user. We will use the sendKeys() method to type something in the Prompt alert box. Here is the code

Code:

package alert;

import org.openqa.selenium.Alert;
import org.openqa.selenium.By;
import org.openqa.selenium.WebDriver;
import org.openqa.selenium.WebElement;
import org.openqa.selenium.chrome.ChromeDriver;

public class PromptAlert {

public static void main(String[] args) {
// TODO Auto-generated method stub
System.setProperty("webdriver.chrome.driver", "D:\\vishal\\selenium\\chromedriver_win32\\dasdf\\chromedriver.exe");     
WebDriver driver= new ChromeDriver();
    driver.get("http://toolsqa.com/handling-alerts-using-selenium-webdriver/");
    
    WebElement promptalert=driver.findElement(By.xpath("html/body/div[1]/div[5]/div[2]/div/div/p[11]/button"));
    promptalert.click();
    
    
    Alert alert=driver.switchTo().alert();
    //for entering message
    driver.switchTo().alert().sendKeys("say hello");
    
    String message=alert.getText();
    System.out.println("Alert="+message);
    alert.accept();
    //you also use alert.dismiss() comand for alert
    driver.close();

}

}

Jmeter

Database Testing: (1) Add mysql JDBC to Jmeter lib folder and restart Jmeter (2) Right click on test name -> add  Thread group (3)...